Additional fields are available for FileMaker data sources now and will be available for Google Calendar sources soon.
Overview
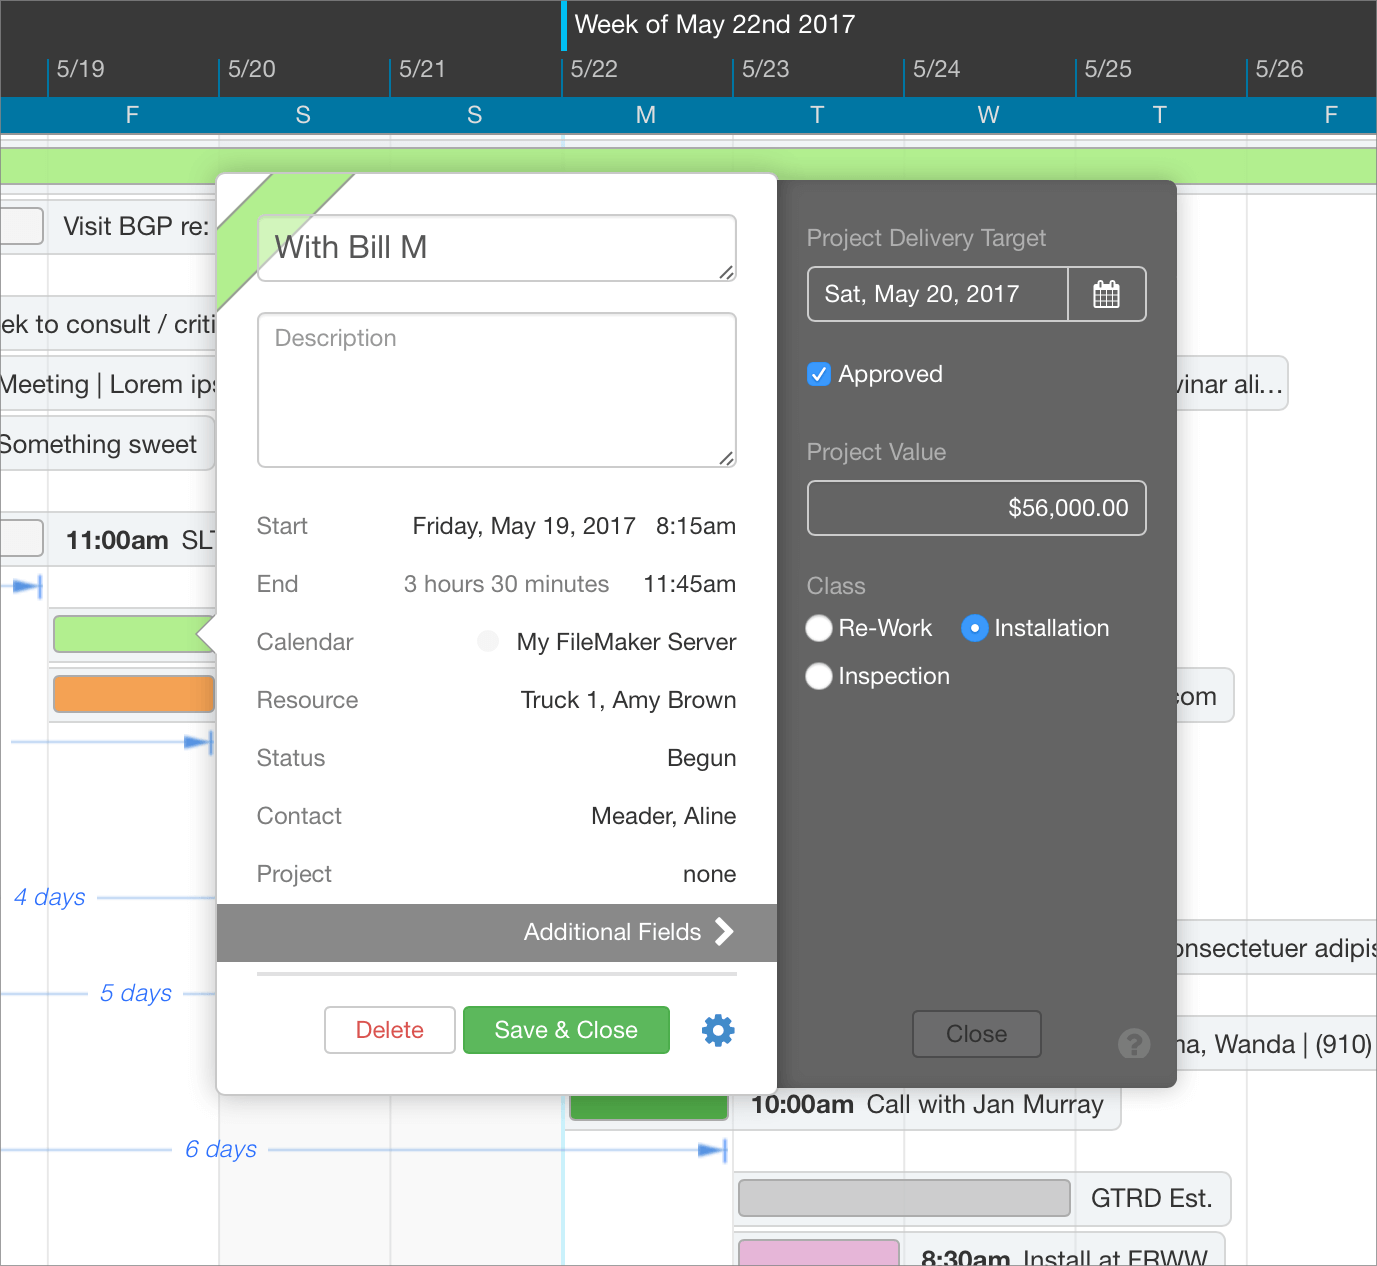
In addition to the fields like Title, Description, Date, and Resource that DayBack provides, you can map additional fields so that users get a complete picture of items on your calendar. This can be especially helpful if your object has required fields that need to be populated when an event is created.
You'll be able to configure the formatting of your additional fields and even create value lists that can match the value lists you're using in FileMaker.
Clicking on "Settings" in the calendar's left hand sidebar will reveal an "Administrator Settings" button that will let you select your calendar sources and configure additional fields.
Setting Up Additional Fields
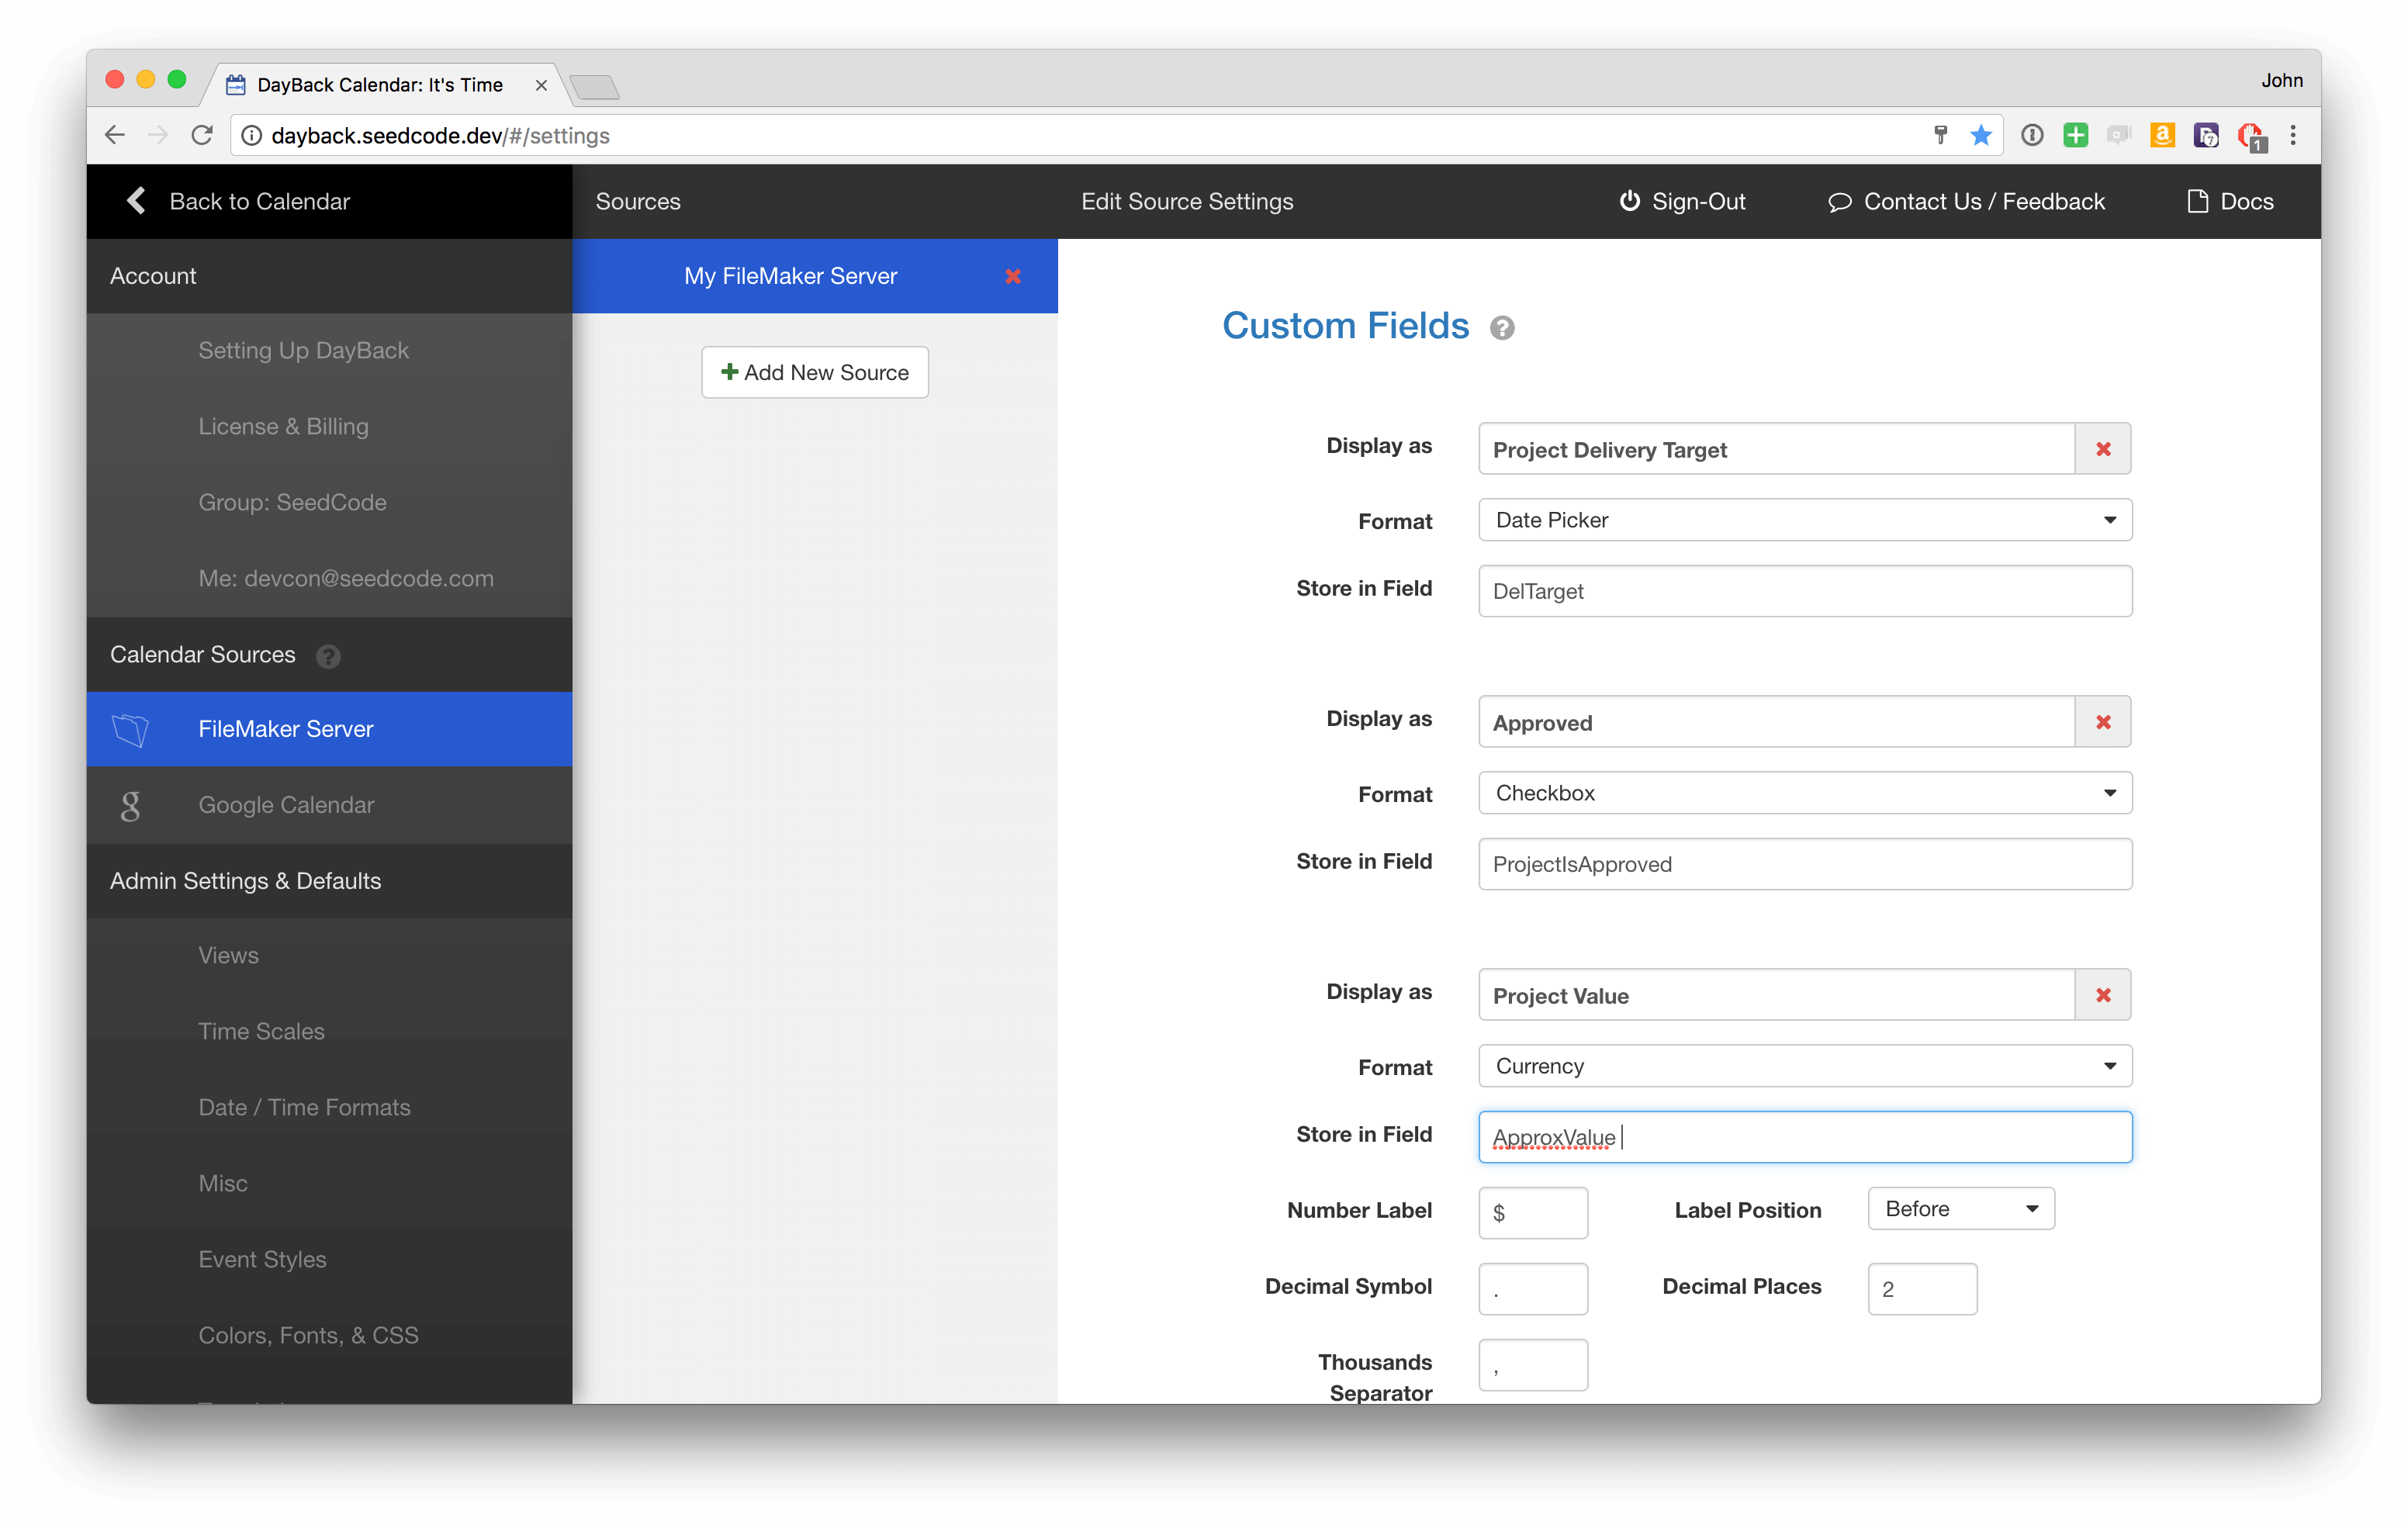
Click "Administrator Settings" in DayBack's "Settings" tab and click "FileMaker Server" under Calendar Sources in the left hand sidebar. Select the source you want and scroll down past the "Field Mapping" section (where the Start and End fields are) until you see "Additional Fields". There you can click "Add New Additional Field" to add field to DayBack's popover.
For each additional field there are three required values along with a few formatting options:
Display As: this is the field label that will show up above the field in DayBack's popover
Format: here you'll determine what the formatting options are (is it a date picker, or a currency field, for example). See "Formatting Options" below.
Store in Field: this is the FileMaker field that DayBack will read from and write to. Just enter the field name itself without the table occurrence.
When you're done configuring your additional fields, scroll down a bit further and click "Validate Field Mapping" this will make sure that everything you've set up will work and that you got your field names right. You can create as many additional fields as you like and they'll appear, in the order created, in the "drawer" to the right of DayBack's popover under the heading "Additional Fields".
You can change "Additional Fields" to say something else in DayBack's translation tab.
Formatting Options
Here are the different field options along with any behaviors unique to then. We encourage you to play around and see which formats work best for you.
Edit Box - This is an expandable text box that you can point at any text field.
Number - A simple number field with lots of formatting options including leading and trailing labels (like "each" or "kg"). Under the hood only the numeric value of number and currency fields is sent to FileMaker: currency labels, etc. are not. If you choose to round a value by adding a number of decimal places, DayBack will round the value when displayed in the popover, but send the actual entered value to FileMaker. So if you set up your field to show two decimal places and enter 4.138, DayBack will show 4.14 but send 4.138 to FM.
Currency - A special number field to which DayBack will add some default formatting. Feel free to change your currency symbol and alignment to suit your preferences.
Percent - Like currency, this is a number field that DayBack pre-formats for you. Feel free to change the formatting.
URL - A text box above which DayBack will render a "go" button so users can open the url by clicking on it. You don't have to enter the http or https prefixes if you don't want to.
Checkbox - This will show a single checkbox beside the field label (like "approved" at the top of the screen. The value "true" will be set into whichever field you choose.
Radio Button Set - Like "Class" in the screenshot above, you'll be able to select one of the values you enter in List Items (which makes up the value list for this field). Separate your values in List Items by commas.
Picklist - This option presents your List Items in a new drawer and lets you select one or more of them (multiple selection is an option for this format). The values you enter in List Items make up the pick list for this field: separate your values in List Items by commas. If you'd like to include a comma IN your values, just enclose in single quotes like this: Sindelar',' John
Date Picker - You can use this for any date or text field: we aim to support timestamp fields in a subsequent release. Clicking in the field will bring your users to a date picker to help them visually select a date.