Overview: What Are Button Actions?
Button actions let you add your own buttons to the calendar. These buttons run your own FileMaker scripts and are a great way to extend the calendar's capabilities.
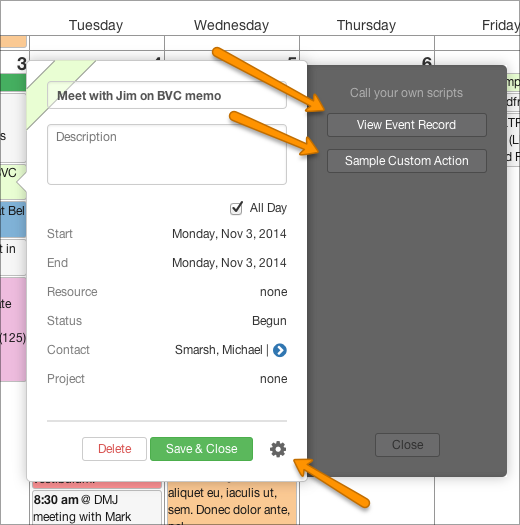
Each source gets its own action buttons, and our sample events table comes with two: one to jump to the event's record in its own FileMaker layout, and another to just show a simple dialog.

Reveal the actions drawer by clicking the gear icon in the lower right of the event's popover. You can add as many custom actions as you'd like: your list of actions will scroll if it exceeds the length of the drawer.
Here's an overview of how the work along with some tips for extending our example actions and making your own:
How to Create Your Own Actions
You'll define your action buttons by editing the script "Load Source Settings at Startup...". For each source in that script you'll see a variable called "$$sc_CustomActions". The definition of that variable declares the names of your action buttons and the names of the scripts they should run.
This takes the form "Button Name<comma> Script Name". Here is the $$sc_CustomActions definition for the popover shown above:
"View Event Record, Go To Event Record From WebViewer";
"Sample Custom Action, Custom Action Example" ;
""
)
This means that DayBack will draw an action button named "View Event Record" and when it's clicked it will call the FileMaker script named "Go To Event Record From WebViewer". The third item intentionally left blank is a "Watch For Event Changes" option. This can be set to True or False. In most cases this is unnecessary and will complicate your scripts so we recommend to leave the third parameter blank. An explanation of this feature is lower in this article.
Note that you can change the text at the top of the drawer ("Call your own scripts") to anything you'd like by adjusting the calendar's translation file.
Add Icons and Colors to your Custom Action Buttons
You can change the appearance of your Custom Actions buttons by adding CSS specific to those buttons. The way this works is by tagging your button with a new class, and then adding CSS for that class. Here're how:
"View Event Record, Go To Event Record From WebViewer, SomeClassName";
"Sample Custom Action, Custom Action Example, AnotherClassName" ;
""
)
background-color: blue;
}
.SomeClassName .btn:hover {
background-color: gray;
}
.SomeClassName .btn:active {
background-color: black;
}
.SomeClassName .btn::before {
content: "\f00c";
font-family: FontAwesome;
padding-right: 5px;
}
Tips for Writing Your Action Scripts
Take a look at our example script "Go To Event Record From WebViewer". That shows you the variables you'll have access to.
Notice also how you can call the script "Find Event by ID (ID)" to jump to your event by passing in the variable $eventID as a script parameter.
The scripts you call with custom actions will have access to a few local variables you can use to find events and manipulate them. These variables will already be declared when your script starts to run:
Watch For Event Changes
Need to run scrips in web apps instead of FileMaker Scripts?
Can I remove the custom actions cog/button from the popover?
This can be accomplished by adding a few lines to your CSS file as described in our CSS documentation here.
Event Actions: run scripts without a button
You can also call scipts based on user actions like clicking on an event or hovering over an event. More here: Event Actions